If you are looking to use mobile phones in the classroom, in school or even for outdoor learning then QR codes could help. QR stands for ‘Quick Response’ as the inventor Denso-Wave intended to have the code decoded at high speed. For more information about QR its history and usage please read the Wiki entry here. You do not need to know any coding as there are several QR Code Generators online which will do they job for you – just do a quick search and pick one. Mobile Barcodes , for example, provides a good tool on their website. You need a mobile phone that has a camera + software that can decode QR codes (most barcode apps do a pretty good job) like for example Neo-Reader. Neo-Reader also has a page where you can check which phones it supports: click here. [update Feb 2011] Another one which is even quicker is i-nigma. Go to www.i-nigma.mobi on your mobile. I-nigma will automatically identify your handset type, download and install.
Most QR Generators allows you to create or ‘hide’ a number of different resources within the QR images, for example:
- website url
- vCard
- 100 character text message
- Phone number
- SMS
- Email address
How could it be used to enhance learning?
Although QR Code is still a new approach to encourage learning in the classroom, there are already many good examples online of how to use it at a basic level in your lessons (see this list of ideas and articles). We hope that the following examples will provide you with a wide range of engaging ways of using QR Codes with your students. Here follows a number of ideas of how this easy-to-use technology can be accessed to raise achievement and student participation in the classroom.
The Hook
Before students enter your room there tends to be a few minutes when they wait patiently (or not so…) outside. Why not get them involved in their learning even before the lesson begins? Visit one of the QR Code Generator websites that you found from your search earlier and create an image which hides a link to a Youtube video or image, quote or cryptic comment that relate directly to what they will be taught in the lesson. For example, a Year 10 History class waited outside Johannes’ classroom and could access this image:

The following image could be use in an ICT or Technology lesson which would entice students to consider technology around them and how simple solutions can solve complex problems:
These examples not only encourages students to take charge of their learning, but also provides an opportunity when they have to concentrate and ‘get into character’ even before the lesson starts, hopefully full of questions about the ‘hook’.
Dynamic Presentations
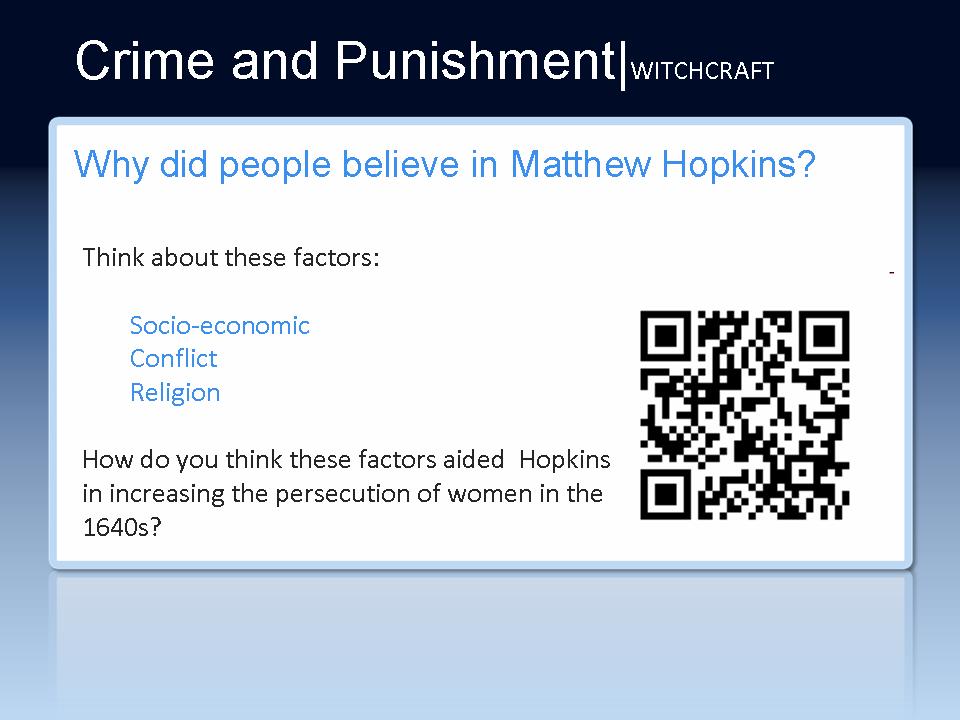
QR Readers have become very sophisticated so students can actually scan images from the back of the classroom. This means that your expositions and student presentations can now be more engaging than ever. For example, if you are teaching a group of A-Level students and you want them to become more actively involved in your presentation then try inserting QR images on particular slides containing links to further reading or a documentary you want them to watch on Teachers TV or Archive.org. Similarly, if you get used to adding a ‘Think about this…’ image in the bottom right-hand corner of a slide which takes students to a question you want them to answer, then this will help generate discussion and also allow them thinking time.
New Students
How often do new students ask how to find a building, a room or even what teacher is in which room? QR Code to the rescue! Place an image outside all classrooms which hides a message which contains:
- The name of the building
- Room number
- Name of teachers
To make it even more specific and useful why not add an image of the room timetable?
Students Participation
Asking to students to use their mobile phones to get involved in the lesson is likely to be popular for some time. Here follows a few examples of how you can encourage students to get involved both during but also after the lesson has finished.
- Discussion: provide a deep link to a specific forum on the Learning Platform where they hold a discussion around the key question of the lesson. Homework could be linked to this and participation could be followed up at the start of the next lesson.
- QR Challenge: split class into a number of teams and get each one to create questions that the other teams have to answer (students create the code and share the images on the Learning Platform).
- QR Debate: same as above but get teams from different sets/classes to have a running debate on a key topic over a half-term. Add QR images outside each others’ classrooms.
Jazzy Worksheets
These may not actually exist but you can make your current worksheets more useful and engaging by adding QR images to support students’ learning.
Idea 1: Say that your Year 7 students are investigating the development of castles in Norfolk, you can improve the traditional activity of matching images of castles with text by adding QR images that hides a set of statements or link to video clip about why a particular castle was too weak and students have to discuss which statement is likely to solve the problem.
Idea 2: Why not link a current activity to a set of MP3 files, for example, songs on Spotify which students have to use to answer the question, or a talk on TED.com that will enable them to explain the key question in a more sophisticated way?
Idea 3: If students are investigating a painting, grid or map, add QR codes next to particular elements which hide links to further reading, Youtube video which explains the painting or show a clip about one of the locations on the map. For example, the image below had been added to an old worksheet on coastal erosion and when the students scanned the image they could watch a video about coastal erosion in Cumbria.
Social Learning Games
Rarely do students have the opportunity to collaborate and work together as well as they do in Physical Education where team work really is important to winning a game. There are ways where this mentality and methods of working can be used in other subject areas by playing Social Learning Games. In such games students have to work in teams to find clues to a problem and they receive rewards if successful. The most favorable social learning games involve careful planning so that students take them seriously, otherwise it is likely to fail. Here follows one example:
- A middle ability Year 9 class were informed that they were to work in teams to solve a mystery and that it would be time limited (20 minutes). The mystery contained keys that were scattered around the school and they would unlock further keys and ultimately the solution to the mystery. Each key was worth 5 points. There were 10 keys in total but the mystery could be solved with a minimum of 7 keys. The winning team was the one that had solved the mystery, runners up was based on the number of points accumulated.
- The mystery was to find a solution and to be able to explain and answer to the question: Why did Eric leave the classroom?
- The question dealt with how children from the school were effected by World War II. ‘Eric’ was forced to leave the classroom together with his classmates to enter the bomb shelter when the air raid siren was set off. No one was hurt but Eric kept a diary so his reactions to the event could be used by our students.
- Students were given 5 minutes to get into groups of 4. They were then asked to think of a good team name (5 minutes) – this was essential for motivation before the task. Each team were given a map of the school with four visible QR Code images displayed. They had to get to one of the images before the other groups as each image contained various levels of difficulty in decoding the message (you could differentiate this by giving them direction to the image you want them to look at first.) and would therefore take them to different areas of the school as the first QR Code would establish which patten they followed on the map. Groups now had 20 minutes (exact time was set) before they had to be back to the classroom. Failure to arrive before the set time would result in disqualification.
- The four sets of 10 keys (QR Code images stuck onto walls, trees, windows, ceilings, doors etc) contained information from primary evidence: diary extracts, newspaper clippings, and video clips, MP3 tracks as well as messages typed up by their teachers, all of which linked to another location on the map where they could find the next key.
- If groups were particularly sharp they would also realise that each ‘pattern’ on the map, the directions they walked, resembled a shape of where Peter walked to i.e. the bomb shelter.
Dynamic Social Games
The other way of involving students in this type of Social Learning Games is to change the game according to what time students get to a key. This requires some effort and pre-planning on your behalf as well as technical know-how – but only some! This type of game could take a similar structure to the Social Learning Game above but will also involve a WordPress blog or using your Learning Platform’s hand-in tool.
- When a student arrives at a key the content of that key will depend on what time they arrived to the location. So for example, they may have been informed to find a certain person to find out about something but when they arrive he’s out. The message they receive will inform them to come back 10 minutes later which means they will have to reconsider their original plan and rethink where to go next.
- How do I create this time based system? Easy, create a ‘Page’ in WordPress and set it to ‘Publish’ at a certain time. Then when that time has passed change the content (or url) and re-publish. Alternatively you ‘Hide’ and ‘Unhide’ the pages from your Smart Phone or laptop at a given time. The other way of doing this is to create ‘Hand in’ folders in Fronter which opens and closes at certain times. All you have to do is to create the QR code images based on the internal Fronter link to that folder. Sounds more complicated than it actually is – try it and see for yourself!
Clever Textbooks
Textbooks are useful and although there are electronic versions available nowadays, most schools could not afford to equip all their students will laptops or enough computer suites for these to be effective. Therefore, we need to do our utmost to ensure that textbooks cater for our students needs and this can be achieved very easily. Simply create an image containing a deep link to a resource page on your Learning Platform (e.g. Moodle, Frog or Fronter) which can support students learning for example by adding learning games, quizzes as well as homework. If you took your time, perhaps in one of the department meetings, then you could also add QR images on individual pages which links to MP3 tracks, videos online, polls, forums, Wiki or other exciting resources that can make that dusty textbook just a little bit more interesting.
Revision
Getting some students to revise can be difficult at times and those that do want to spend time on their work may lose sight what they are doing or just run out of steam. The latter can be attributed to revision material and activities that essentially are note taking tasks and can therefore fail to engage even the most industrious of students. Here are a few ideas that work well to encourage revision and engagement:
- The Revision Board: create a series of QR images that hide links to subject specific video clips students can download to their iPods to watch at their leisure, then place these images on the Department’s Revision Board in the corridor. You’d be surprised how often students come back to check on updated resources
- Top-Tips: images containing revision tips, tools for learning or exam techniques you feel that they would benefit from looking at.
- Revision QR Stickers: provide classes with stickers which contains a RSS Feed to the Department or Team’s blog. This ensures that the content is always updated. Stickers are very reasonably prices nowadays, alternatively buy Business cards with the image on them.
The ideas covered in this post only give you a starting-point to using QR-Codes in education but we will keep adding more ideas. Have you used this technology successfully in the classroom, why not add a comment and tell us about it?
[relatedPosts title=”Related Posts: ” num_to_display=”4″]


